|
(Update 11/26/06)
Greenland paddles are traditionally made of wood, which has been a good material for making them. But the carbon fiber Greenland paddle made by Superior Kayaks, Inc. intrigued me, so I ordered one. When I opened the package, I was awed at the beauty of the paddle. The modern material wonderfully complimented the ancient design. Being the home builder I am, I just had to build my own carbon fiber Greenland paddle. Building this paddle isn't much different than building a composite kayak. Like the deck and hull of a kayak, the pieces of the paddle are molded and then assembled at the seams, which is a construction technique found in almost any fiberglass manual. But before any molding can be done, a plug has to be carved, and from it, a mold is formed. I don't know how Superior Kayaks, Inc. is able to beautifully assemble the molded pieces without any apparent (as far as I can see) composite tape reinforcement on the outside of the seams and still make the paddle so strong. I'm not about to cut into a perfectly good $340 paddle to find out how they did it, so I settled for making my paddle using the common technique of composite tape reinforcement on the outside of the seams, and it actually turned out pretty nice. Building the Plug
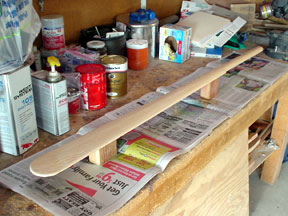
Building the plug starts like carving any wooden Greenland paddle, except that only one side of one blade and the loom is made. The other side is flat. Make sure that the edge on each side of the blade is exactly like the opposite side so that the two halves of the molded carbon fiber blades will meet perfectly at the seams when they are joined back to back. Also, avoid making sharp curves that carbon fiber and fiberglass cloth will have troubles forming around. The directions I recommend for carving a wooden Greenland paddle are by Chuck Holst at the Qajaq USA website. Also, Matt Johnson has an online video on how to carve a wooden Greenland paddle using the above directions. My own Greenland paddle specifications are at this link.
The plug needs a flange, which is simply a flat piece of wood that is epoxied to the blade half. Be sure to read and study the user manual for the brand of epoxy being used. Before epoxying the blade half and flange together, repeatedly coat them with epoxy and sand them smooth until they are shaped perfectly. When they are epoxied together, be sure to keep the fillet between the blade half and flange smooth and as small as possible. After the epoxy has cured for three days, apply five coats of Johnson paste wax to the plug so the mold won't stick to it. Then, for the same reason, brush on a coat of PVA mold release and allow it to dry before building the mold. Building the Mold
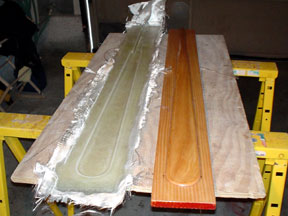
The mold is built by applying layers of fiberglass to the plug. Along the sharp corners of the plug, which is between the blade half and flange, apply a fillet of epoxy thickened with a filler, because the fiberglass cloth won't bend that sharp. Use two layers of six-ounce fiberglass, let the epoxy cure, and then add one layer of 24-ounce fiberglass to stiffen the mold.
After allowing the mold to cure three days, pull it off the plug. Then prepare the mold like the plug was with five coats of paste wax and one coat of mold release. To prevent the mold release from forming a puddle in the mold, set the mold vertically on the loom end, until the mold release is dry. Molding the Blade Halves
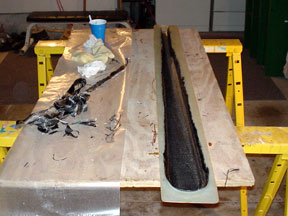
Because the mold is a small and curved area, wetting out the lay-up with epoxy is easier on a sheet of wax paper on a flat surface. The lay-up I use is one layer of 5.7-ounce carbon fiber, four layers of 6-ounce fiberglass, and then another layer of carbon fiber, which results in a finished paddle weighing around 26 ounces. Wet out the first layer of carbon fiber, put the four layers of fiberglass over it together, wet them out, and then put on the other layer of carbon fiber. After all the layers are wetted out, use a squeegee to remove the excess epoxy. Lately, there has been a world wide shortage of carbon fiber, making it hard to find, or if you can find it, maybe too expensive. Fortunately, there is an alternative. Four layers of 10-ounce fiberglass work well, and in some ways, even better. The fiberglass lay-up is easier to work with, because you can see if the fiberglass is wetted out properly. You can also see any air bubbles trapped between the lay-up and mold. While the carbon fiber paddle is very stiff, the fiberglass paddle has a lot of flex. The finished fiberglass paddle weighs around 30 ounces.
Before the epoxy has fully cured, the final trimming of the lay-up in the mold is done with a razor blade held flat against the flange edge. This step must be done when the epoxy has stiffened some and is still slightly sticky. Depending on the type of epoxy used and the room temperature, reaching this curing state can take from one to six hours. Use a single edge, steel backed razor and keep it angled toward the flange during the cut to prevent the lay-up from being pulled off the mold. Let the epoxy cure at least eighteen hours before popping the blade half off the mold. The blade half pops out easily by just bending the mold. Wash the blade half with water to remove the mold release from it. Four blade halves are needed for one paddle. Between each blade half, wash the mold with water, dry, and apply a coat of paste wax and mold release. Assembling the Four Pieces
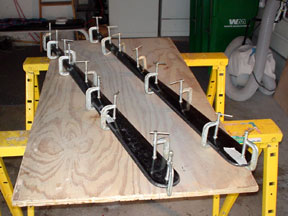
Slightly sand the seam edges smooth, apply epoxy to the them, and then lightly clamp the blade halves together until the epoxy has cured. Rubber bands can also be used instead of clamps. Before the epoxy begins curing, it is important to make sure the seams are straight and that there is no twist in the blades.
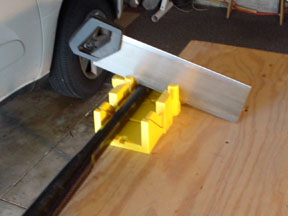
Use a miter box for a straight cut at the loom end of each piece, which will be the center of the paddle.
Epoxy the seams between the two ends at the loom, adding thickened epoxy if there are any gaps. To help the seam be a bit stronger until it is fully reinforced, also lay a small 2" by 2" strip of epoxy saturated carbon fiber inside the loom and across the seam, allowing gravity to hold it down. It is important to make sure the blades are lined up straight and are not twisted before the epoxy begins to cure. The seam between the two ends at the loom will be very weak until it is fully reinforced, so the paddle must be handled gently and stored supported straight until that point.
After the epoxy has cured for at least 24 hours, lightly sand the seam and 1 1/2 inches to each side of it. Then wrap it four times with a three-inch-wide piece of wetted out carbon fiber that is bias-cut. A bias cut is done at a 45 degree angle to the weave, and it is much stronger than a regular cut, because it allows each strand in the weave to cross the seam rather than just half of them. Once the epoxy in the wrap has cured for three days, the seam in the center of the loom will be fully reinforced and strong.
Lightly sand 1/2 inch to each side of the seams running the length of the paddle. Then use one-inch-wide fiberglass tape to reinforce the seams. It is easier to wet out the tape before you put it on the seams. If the edges of the paddle blades are sharp, the tape may not wrap around the edges well. In that case use bias cut strips of fiberglass cloth, which wrap much better. When the epoxy has cured, apply a coat of epoxy over the tape to help fill in the fiberglass weave. FinishingAfter the epoxy has cured for at least 48 hours, it is time to start sanding. Try to avoid sanding into the carbon fiber in the molded blades, because it will weaken the paddle. Sand the edges of the fiberglass tape to feather them smoothly into the molded blades. Start with 60 grit sand paper, and get more fine with 100 and 220 grit. After the sanding is done, the paddle can be used, but wait two weeks for the epoxy to fully cure before varnishing. Wash the paddle with soapy water to remove the epoxy's amine blush, which doesn't mix well with varnish. Lightly sand the paddle with 320 grit. Then brush on two coats of marine varnish or paint for UV protection. Materials for the Plug, Mold and Paddle
The Point Bennett Sea Kayak This page © Copyright 2005-2006, Duane Strosaker. All rights reserved. |


