|
Materials
Tools
Preparation
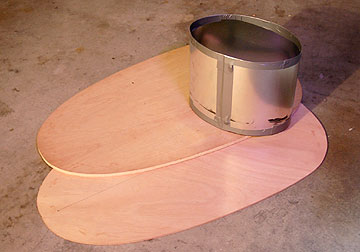
Spray Deck JigUse the paper to trace around the outside of your cockpit coaming. Cut the paper along the trace line. Temporarily nail the two pieces of plywood on top of each other. Place the paper on top of the plywood and trace the cockpit outline on it. Use the jig saw cut the two pieces of plywood along this line. The plywood should match the outline of your cockpit coaming. Remove the nails to separate the two pieces of plywood. Waist Tube JigRoll the sheet metal into a circumference equal to your waist size. Squeeze the roll into an oval shape similar to your waist. Tape the edges of the sheet metal to avoid cutting yourself and the neoprene. Neoprene Cutting TipsScissors are fine for cutting neoprene, but cuts can be made much smoother with a cutting wheel and board. Don't pull or stretch the neoprene while making cuts. A cutting wheel and board and a long metal ruler make cutting the straight lines for the waist tube quick and smooth.
Hand Stitching TechniqueCut a piece of thread as long as your outstretched arms. Using two needles, thread one needle through each end of the thread. Run one needle through the material and pull the thread halfway through. Starting with the needle above the material, push the needle down through the material 1/8" over and pull the thread through. Then push the other needle up through the same spot that the other needle just came down and pull the thread through. Pull each end of the threat tight. Repeat the stitch. When the thread runs out, tie off the ends together on one side of the material in a square knot with an extra twist each way . Then push one end of the thread with the needle back through the last stitch, pull the knot into the material, and cut and singe each end of the thread. Start with new thread one stitch back.
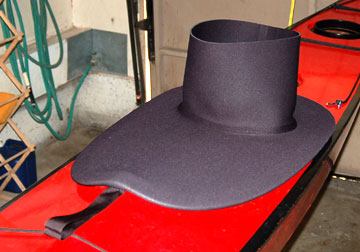
The Spray DeckPlace one of the pieces of plywood over the neoprene. Be sure the plywood is to one side to leave enough neoprene for the waist tube. Using scissors, cut the neoprene approximately one inch around the outside of the plywood. Because the neoprene takes the most stress on the underside at the front of the cockpit, where the grab loop is positioned, this area is reinforced with a nylon iron-on patch that is 3" long, 1 1/4" wide, and crescent shaped. Position it on the side of the neoprene that will be facing down. Follow the manufacturers directions for ironing on the patch, but don't let the neoprene get too hot or damage may occur.
Generally, the bungee length should be equal to twice the length of the cockpit coaming (twice the straight line distance from the outside front of the cockpit coaming to the outside back). However, check this length of bungee around your cockpit coaming before cutting to make sure it's not to loose or tight, because not all bungee stretches the same. After cutting the bungee, sew it end to end, pushing the needles through the bungee and going back and forth across the ends at different points about a half dozen times. The sewing has to be strong enough to keep the ends from pulling apart. Center the cut neoprene over one of the pieces of plywood. Make sure the nylon iron-on patch is facing down. With the sewn ends of the bungee centered at the front, wrap the bungee around the outside edge of the other piece of plywood. The easiest way to do this is to place the plywood on the floor and use your feet to hold one end of it and the bungee down while using your hands to pull the bungee around the other end. It may take a few tries. Make sure the stretch in the bungee is equally distributed around the plywood. Carefully pull the nylon webbing for the grab loop halfway through between the bungee and plywood at the front. Tucking the grab loop under the plywood, place this plywood, bungee and grab loop set on top of the neoprene. Use the clamps to hold the two pieces of plywood together. The neoprene between the pieces of plywood should not be wrinkled or stretched.
Beginning at the front, sew through the grab loop, shock cord, and neoprene, and go all the way around. Use pliers to help push and pull the needles through the grab loop section. Sewing through the shock cord and neoprene is easier, but using a thimble helps. Sewing the bungee takes 3-4 hours. When the sewing is complete, use scissors to trim the outside edge of the neoprene approximately 1/4" from the bungee.
Remove the spray deck from the plywood. Sew the nylon webbing together in front of the bungee and at the ends to complete the grab loop. Waist Tube
With the spray deck on the cockpit, position the sheet metal roll on the spray deck where your waist will be located, and trace around the roll with a marker. Remove the roll and take the spray deck off the cockpit. Mark another circle 1/2" inside the roll mark. Use scissors or a cutting wheel and board to cut along the inside mark. Cut the neoprene for the waist tube 9 inches wide and 1/2 inch less than your waist size in length. Following the neoprene cement instructions, apply the cement to the ends of the neoprene and press the ends together to form the waist tube. Then apply the cement to the bottom of the waist tube and the cut-out circle in the spray deck. Just before the cement is ready for the parts to be pressed together, position them on the sheet metal roll to make aligning and pressing the parts together easier. Once they are pressed together, remove them from the sheet metal roll and press the parts together some more to get a good bond.
After the cement has dried for at least an hour, iron on the Melco seam tape to the inside and outside of the waist tube seams. Set the iron to "silk" or the lowest steam temperature without the steam and press the iron to the tape for around 15 seconds. After the tape cools, check for any loose edges and use the iron again if necessary.
Be sure to test removing the spray skirt on land before using it on the water. The Point Bennett Sea Kayak This page © Copyright 2006, Duane Strosaker. All rights reserved. |


